- Network
- Kubernetes
- Network Policy
- Zero-trust
How to chart Kubernetes egress traffic with ease
Discover how Otterize helps you gain visibility into your egress Kubernetes connections.
Written By
Nic VermandéPublished Date
May 16 2024Read Time
7 minutes
In this Article
Kubernetes' ingress traffic management has been well-documented, from configuring on-premises or cloud load-balancers to creating Ingress resources. The recently introduced Gateway API model further standardizes this process and enables easier integration for the ecosystem. However, designing effective egress architectures in Kubernetes often receives less attention. Controlling egress traffic, though not a new concept, frequently involves a blend of native Kubernetes network policies, service-mesh egress gateways, and CNI-specific solutions. While essential, these tools can sometimes lack the flexibility required by dynamic, modern applications.
They typically focus on 2 key functionalities:
- Masquerading: Egress traffic is steered to a predefined set of nodes where IP packets are NAT'd to specific source IP addresses. This can be achieved with certain Container Network Interfaces (CNI) plugins like Calico or Cilium, as well as with service-mesh egress gateways.
- Access control: Egress communications are restricted to specific CIDR ranges and domain names by enforcing security rules associated with an egress gateway. While DNS-based filtering is not natively supported by Kubernetes network policies, the same solutions I’ve mentioned above provide the ability to filter based on FQDNs (Fully Qualified Domain Names).
However, even with these capabilities, there's a missing piece to the puzzle. Before effectively implementing masquerading or fine-grained access control, you need one key element: visibility. Pinpointing exactly which services initiate egress traffic, the precise domains they reach out to, and their corresponding IP addresses, is often an opaque and frustrating task. While various tools exist for this purpose, the challenge lies in ensuring their output consistently aligns with the latest application traffic patterns, as well as code and system design changes.
This is where Otterize enters the picture. Our Network Mapper is designed to illuminate the dark corners of your Kubernetes egress traffic. With a zero-configuration, lightweight deployment, it automatically and continuously generates a visual map of these outbound connections as containerized workloads access external services—whether those are public internet addresses or simply services outside the cluster. And it doesn't stop there: Otterize takes visibility to the next level by suggesting relevant access policies in the form of ClientIntents custom resources, enabling faster policy updates and enhancing security within your CI/CD pipeline.
🚨 Wait! If you want to learn more about these topics, consider the following:
Take control: Our Network Mapping and Network Policy tutorials provide a hands-on opportunity to explore these concepts further.
Stay ahead: Join our growing community Slack channel for the latest Otterize updates and use cases!
Understanding egress traffic mapping with Otterize
To illustrate these capabilities, I’m going to walk you through a scenario featuring my overengineered dad jokes microservices application, where a specific service makes API calls to OpenAI and AWS DynamoDB.
Here’s a quick overview of the application’s architecture: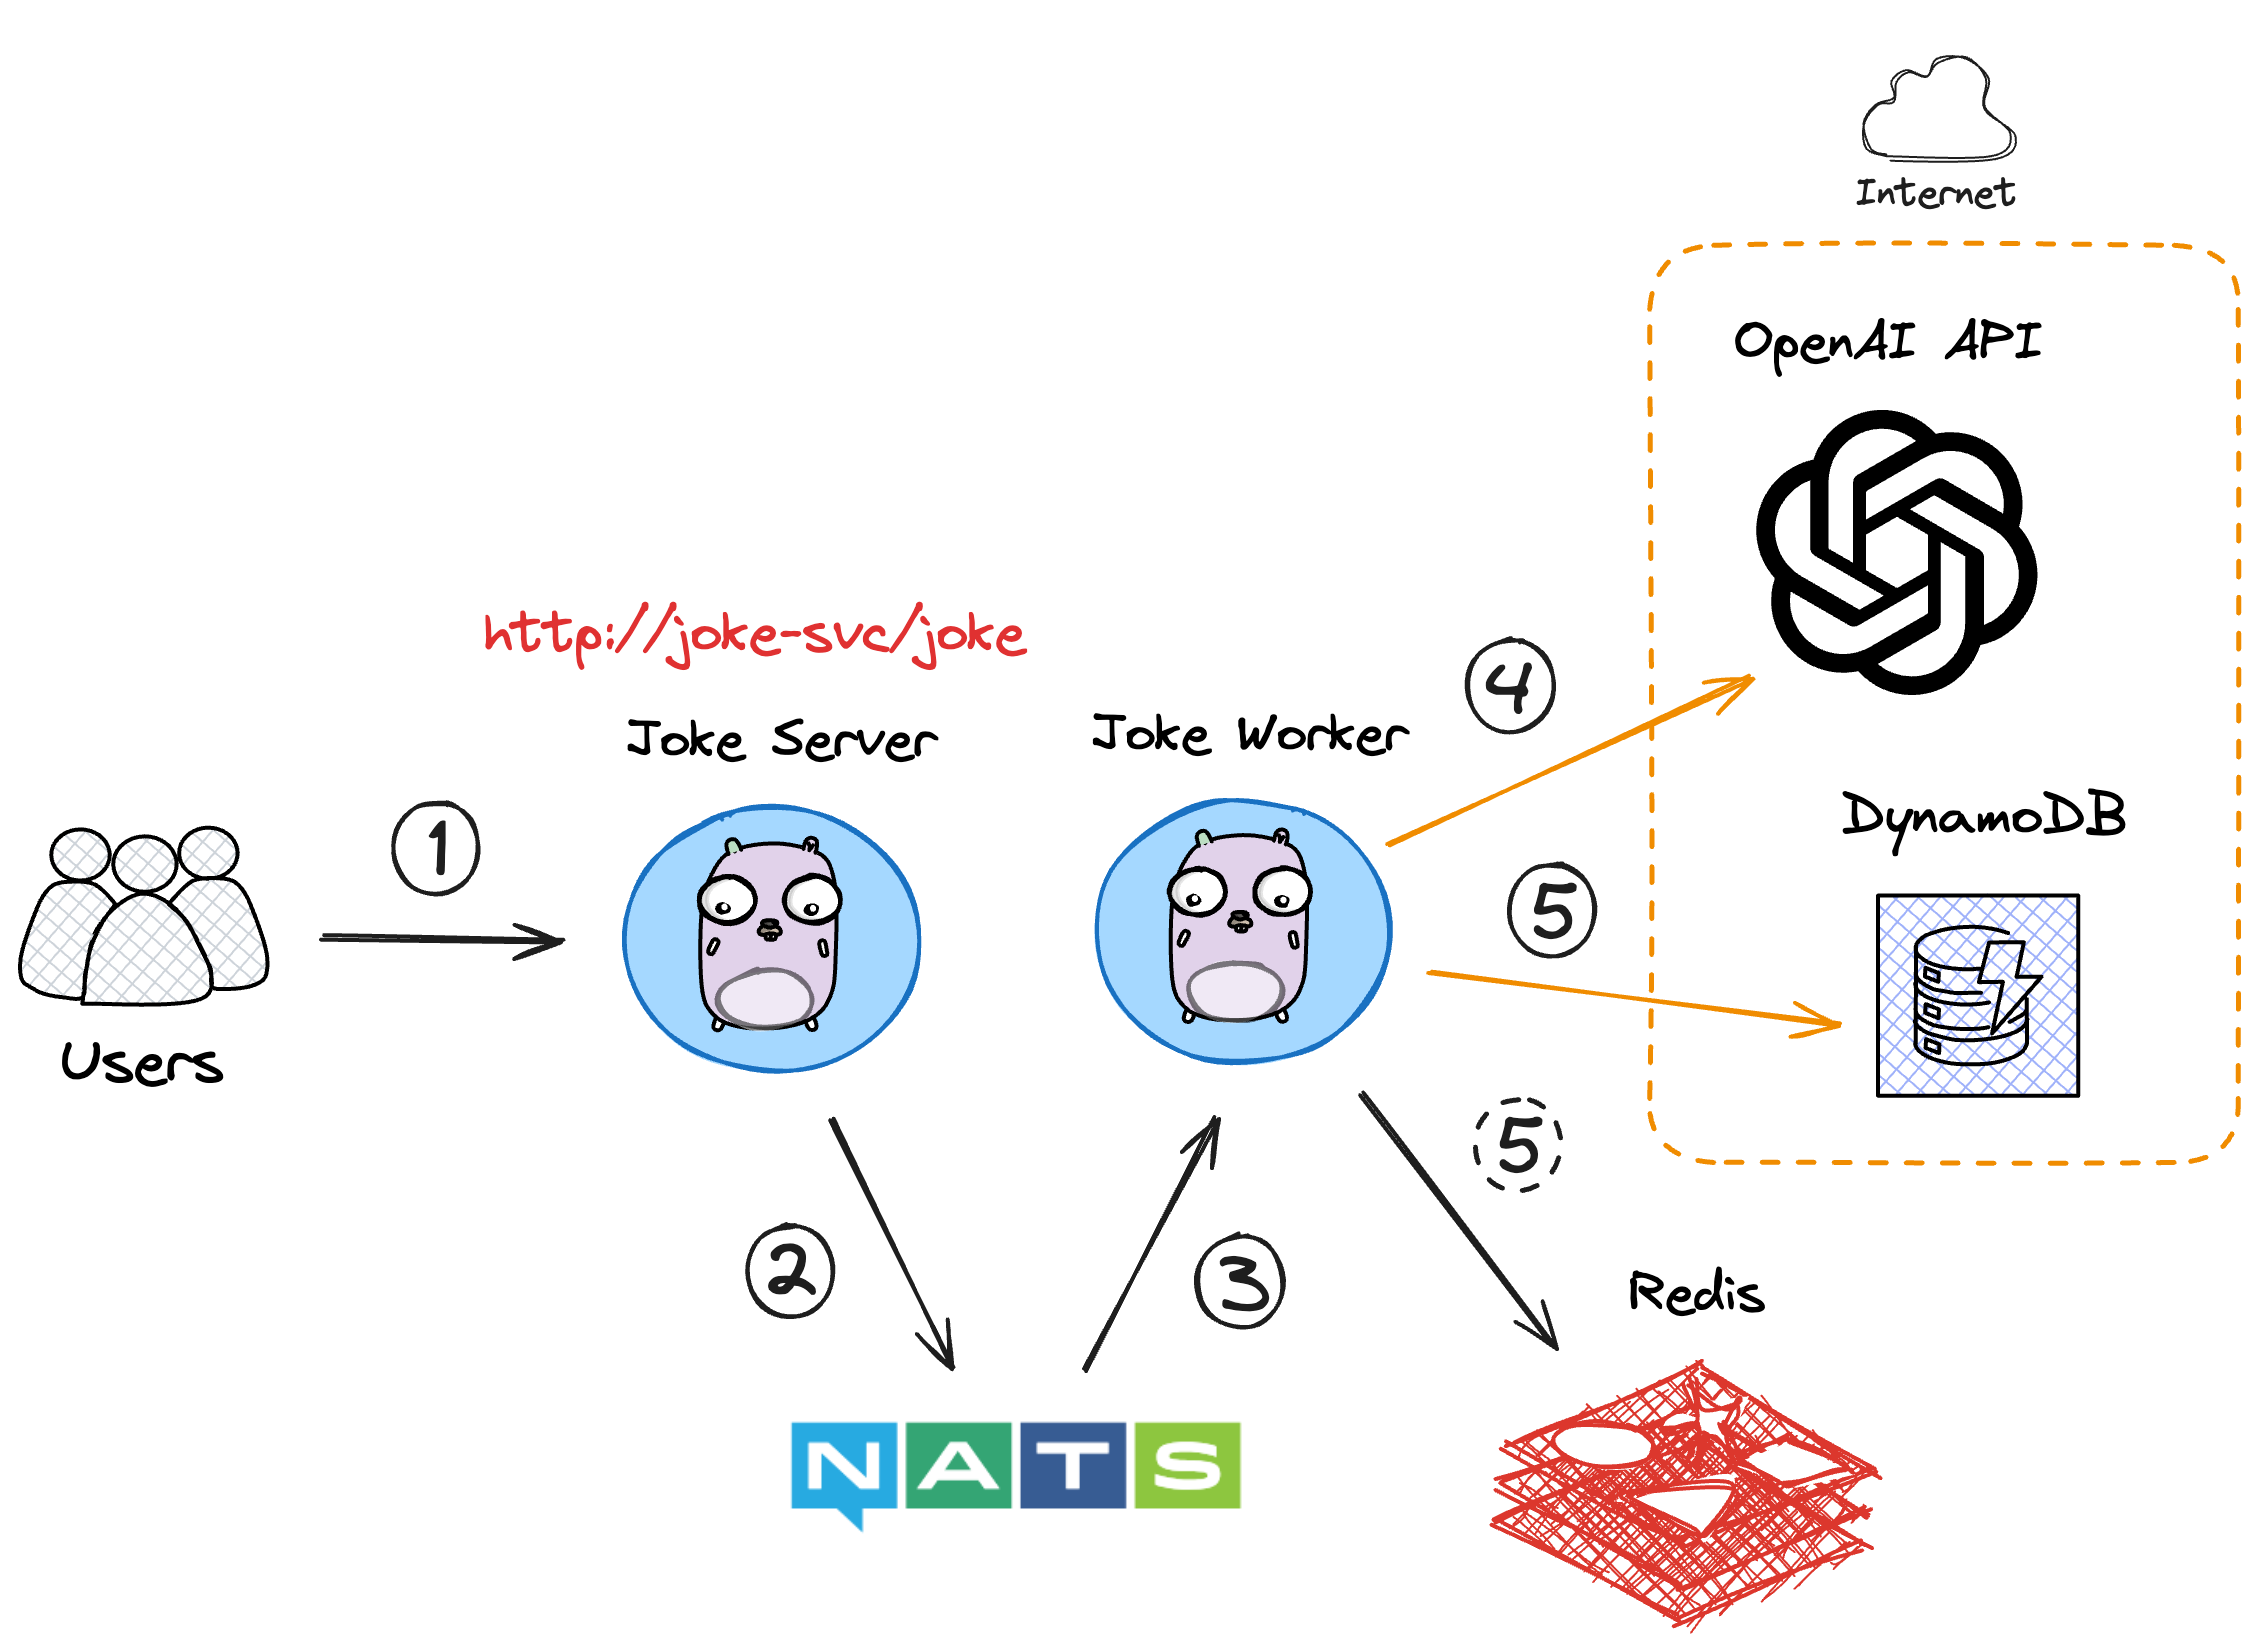
The user makes a request to the joke service HTTP endpoint.
The joke server publishes 2 messages in their respective NATS queues—one to handle the request and another to save the joke to Redis and DynamoDB.
The joke worker subscribes to both queues and processes the messages.
It connects to OpenAI to generate the joke using the chat completion API.
The joke is saved to a DynamoDB table and a local Redis cache.
The joke is returned to the user by the joke server—directly from OpenAI initially, or from Redis after 20 jokes have been stored in the cache.
After deploying the application in a cluster where Otterize has been installed and connected to Otterize cloud, the access graph displays the following view:
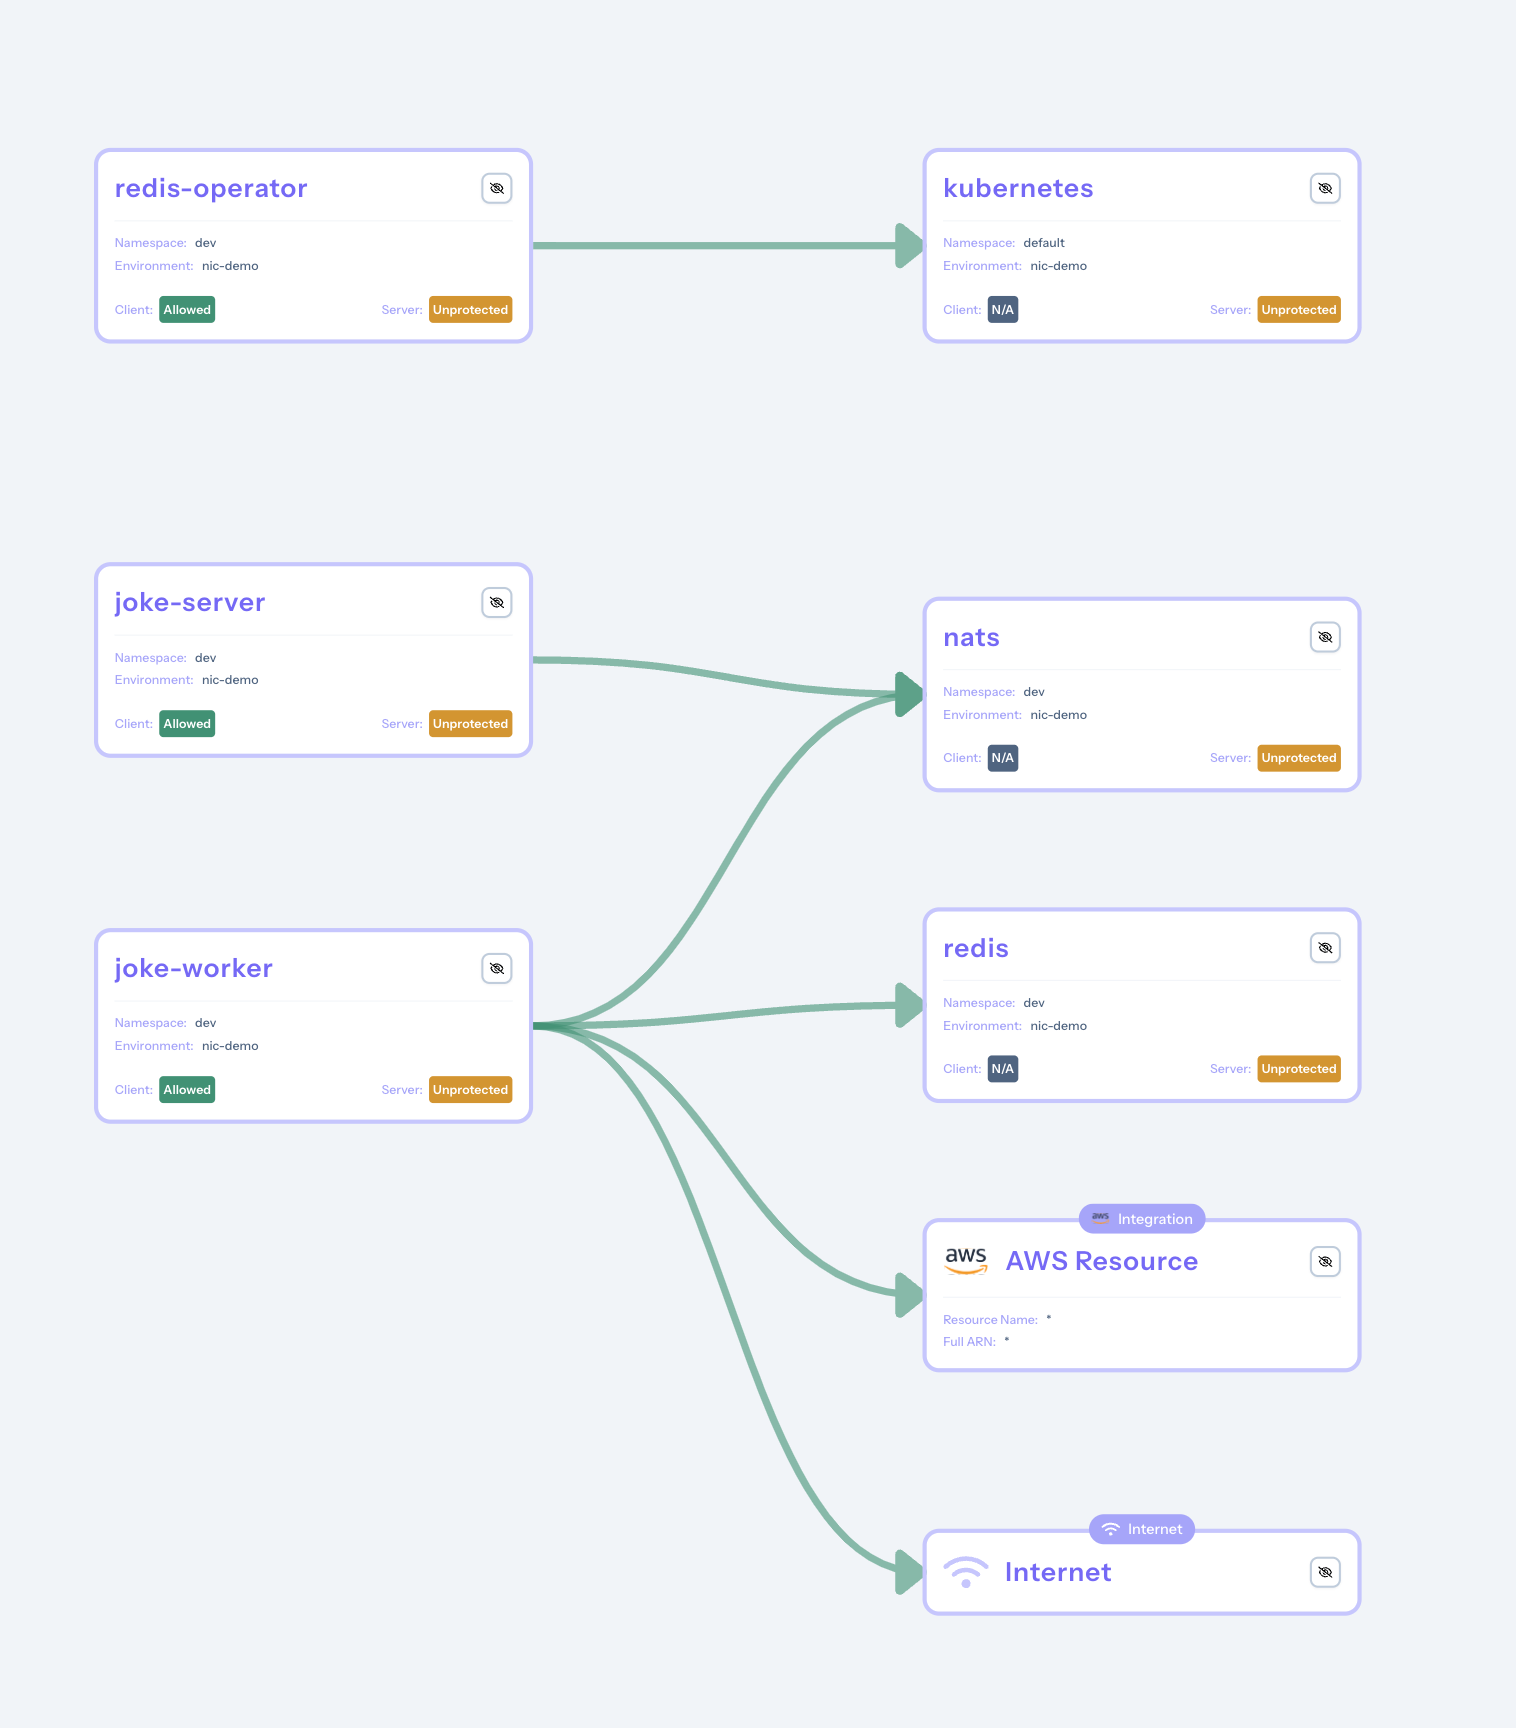
We can notice that the joke worker service is currently interacting with resources on the Internet. After selecting the Internet block, we can see the following information:
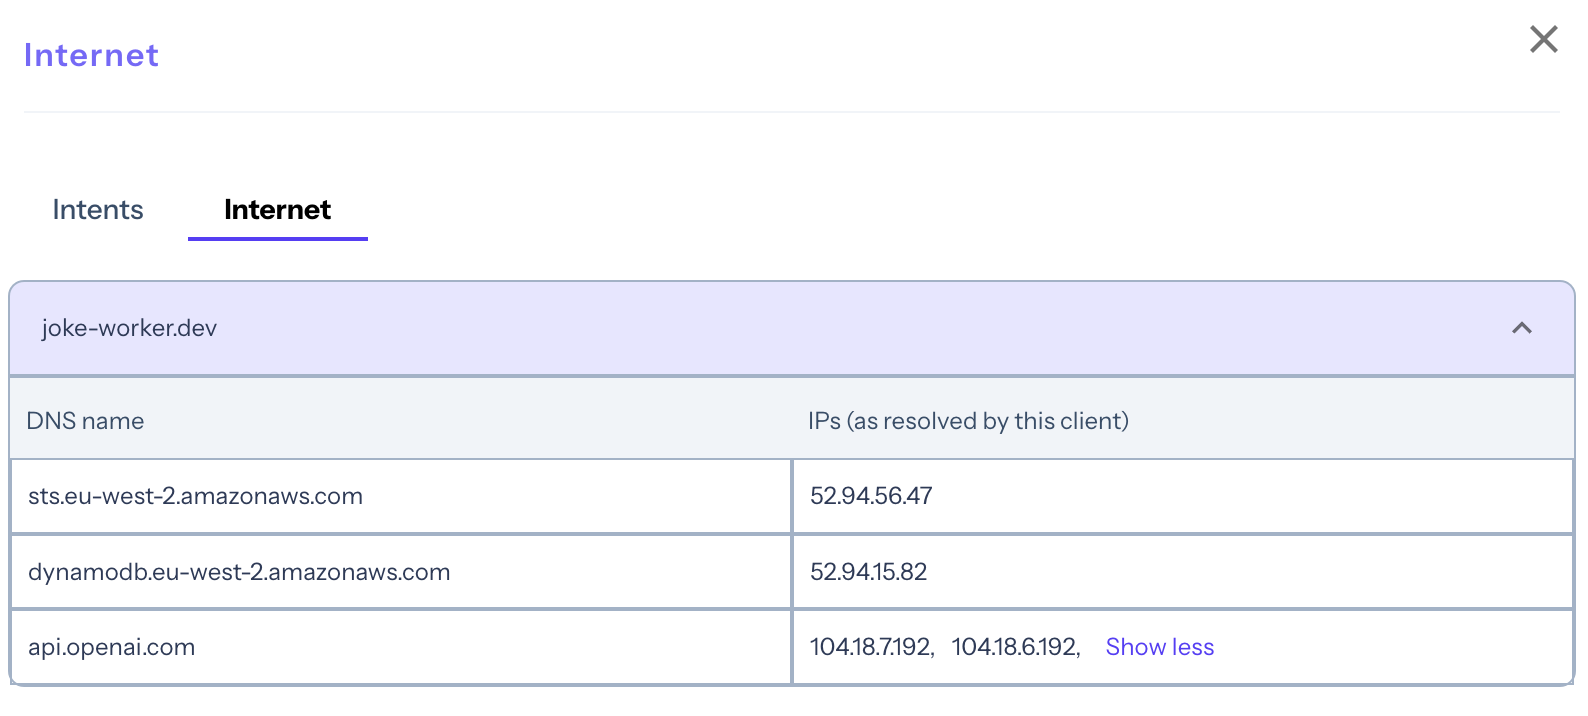
The Network Mapper has effectively detected the external access requests of the joke worker, including the IP addresses and FQDNs of the accessed services.
This includes:
- The AWS STS service, allowing the joke worker container to use short-lived credentials to assume the role providing access to DynamoDB.
- The DynamoDB service in eu-west-2, where the joke table has been created.
- The OpenAI API, with 2 distinct IP addresses for load balancing.
In the Intents section of the Internet block, we can discover the client intents suggested by Network Mapper:
apiVersion: k8s.otterize.com/v1alpha3
kind: ClientIntents
metadata:
  name: client-intents-for-joke-worker
  namespace: dev
spec:
  service:
    name: joke-worker
  calls:
    - name: "*"
      type: aws
      awsActions:
        - "dynamodb:*"
    - name: "nats"
    - name: "redis"
    - type: internet
      internet:
        domains:
          - api.openai.com
          - dynamodb.eu-west-2.amazonaws.com
          - sts.eu-west-2.amazonaws.com
This YAML manifest can directly be deployed into the Kubernetes Cluster to create a ClientIntents resource. It specifies the rules allowing the requested traffic to exit the cluster in a granular way. Depending on the type of calls, these rules will be translated into different types of security policies. Today, we’re interested in the Internet section of the manifest. The Network Mapper represents the IP addresses accessed by the application into simple and humanly readable domains. This enables easier policy management, as you can focus on domain names rather than memorizing specific IP addresses.
Because Otterize is aware of the corresponding IPs, the Network Mapper will then translate the ClientIntents calls into Kubernetes egress network policies that grant access to the following IPs: 52.94.56.47, 52.94.15.82, 104.18.7.192, and 104.18.6.192.
Note: If you'd like to learn more about the resulting policies, we'll cover the details in an upcoming post. Alternatively, check out this tutorial to discover how Otterize enables network mapping and programmatic network policy creation.
With this granular visibility provided by Otterize, the opacity surrounding egress traffic becomes more clear. The suggested ClientIntents make policy creation a breeze, allowing you to easily implement both masquerading (if needed) and targeted FQDN-based filtering. This puts you back in control of your Kubernetes security posture.
Summary
Our lightweight Network Mapper combined with Otterize cloud unveils a dynamic, up-to-date visualization of your outbound connections. But it doesn't end there! We translate this visibility into actionable ClientIntents. This bridges the gap between insight and enforcement, transforming the way you create and continuously refine your Kubernetes egress policies.
Why Otterize matters
It’s time to stop struggling with complex configurations and policies based on guesswork. If hidden dependencies and potential security gaps keep you up at night, it's time for a new approach. And that's where Otterize comes in.
With Otterize, you can:
Stop playing defense: Discover hidden connections, potential security holes, and unexpected dependencies right now, before they become problems. Proactively tighten your egress controls, making your cluster more resilient to attacks.
Build policies that actually work: Say goodbye to trial and error with network policies. Visualize your traffic, and let Otterize generate ClientIntents based on real-world usage. Implement them in a breeze, knowing your workloads can access what they need and nothing more.
Ditch the complexity: Start seeing your egress traffic with a lightweight, auto-configuring deployment. No more complicated setups or clunky tools. Focus on securing your cluster, not wrestling with infrastructure.
Gain that immediate visibility and start simplifying your Kubernetes egress management!
Ready to see Otterize in action? To experience how Otterize empowers you to protect your cluster, streamline policy creation, and save valuable time, try one of our tutorials.
Let’s connect! If you want to discuss your experience, a specific use case, or just ask questions, don’t hesitate to join our community Slack channel and directly reach out to me!
In this Article
Like this article?
Sign up for newsletter updates
Resource Library
Read blogs by Otis, run self-paced labs that teach you how to use Otterize in your browser, or read mentions of Otterize in the media.
- Kubernetes
New year, new features
We have some exciting announcements for the new year! New features for both security and platform teams, usability improvements, performance improvements, and more! All of the features that have been introduced recently, in one digest.
- Kubernetes
First Person Platform E04 - Ian Evans on security as an enabler for financial institutions
The fourth episode of First Person Platform, a podcast: platform engineers and security practitioners nerd out with Ori Shoshan on access controls, Kubernetes, and platform engineering.