- Core
- IBAC
- Network Policy
- AWS
- EKS
How to gradually roll out network policies with the new AWS EKS VPC
Learn how Otterize makes it easy to apply zero-trust network policies to one service while being completely certain you aren't affecting any others. Discover how you can do that in a few minutes.
Written By
Ori ShoshanPublished Date
Sep 13 2023Read Time
5 minutes
A couple of weeks back, AWS announced built-in support for enforcing Kubernetes network policies for the native VPC CNI. By default, Kubernetes allows all pods to communicate with no restrictions. With Kubernetes network policies, you can restrict traffic, and achieve zero-trust between workloads in your cluster.
Before, you had to deploy a third-party network policy controller, or replace the CNI completely, which can be very complicated for an existing cluster. You probably do want to use the VPC CNI so that your Kubernetes pods can communicate with services and other workloads in the VPC network directly.
Your next question might be: so how do I roll out network policies in my clusters? It can be difficult to do, as once a pod is affected by a network policy, anything not allowed would be blocked.
Otterize makes it easy to apply zero-trust network policies to one service while being completely certain you aren't affecting any others. Let's see how you can do that in a few minutes.
If you prefer to follow along in tutorial format that also explains how to configure an AWS EKS cluster with the network policy support in the VPC CNI, check out the AWS EKS VPC CNI tutorial.
Step 1: map your cluster
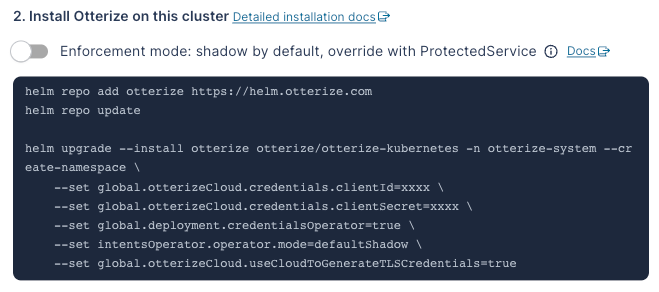
Head on over to Otterize Cloud for instructions to deploy Otterize connected to Otterize Cloud. Add a cluster and Otterize Cloud will generate the Helm command to deploy Otterize, complete with the credentials to connect to Otterize Cloud.
Immediately after deploying, the services in your cluster and their communications will appear:
Want to deploy open source-only and without the cloud? Run the following command:
helm repo add otterize https://helm.otterize.com
helm repo update
helm install otterize otterize/otterize-kubernetes -n otterize-system --create-namespace \
   --set intentsOperator.operator.mode=defaultShadow
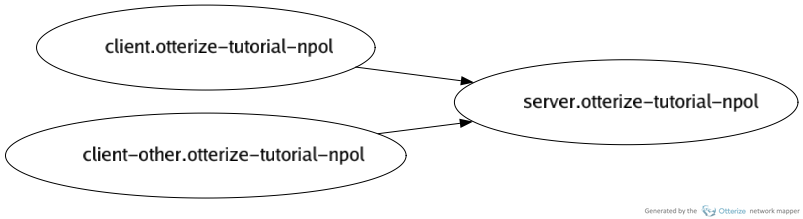
When installed without the cloud, you can use the open-source Otterize CLI to generate a visualization.
If you haven't installed the CLI, do so now (or follow the link for setup instructions for Windows or Linux):
brew install otterize/otterize/otterize-cli
Generate a visualization:
otterize mapper visualize -o map.png
Which generates the following image:
Step 2: pick a server you want to protect with network policies
Pick a server that you want to protect, either because it's easy to get started with, for example because it has few clients, or because protecting it is high-value, such as the ledger service for a bank, which controls the transfer of money.
In this example, let's protect the service called server.
In the previous step, we've installed Otterize in "shadow mode", by setting the flag --set intentsOperator.operator.mode=defaultShadow. This makes it so Otterize will not create network policies unless explicitly enabled for this service.
Step 3: declare which clients access this server
With Otterize, you don't manage network policies directly. Instead, each client that connects to the server you want to protect, needs to declare its intent to do so.
This is accomplished by declaring a custom resource, ClientIntents, which should sit in the same Helm chart and be deployed along with the services that access server. In our case, it will be deployed along client and client2.
Fortunately, you do not need to write these yourself. The open-source Otterize CLI can do that for you.
Now, export ClientIntents for clients accessing the service server.otterize-tutorial-npol, which means the service server in the namespace otterize-tutorial-npol. You can even pipe this directly to kubectl, to make it easy to try out.
otterize network-mapper export --server server.otterize-tutorial-npol | kubectl apply -f -
See the output:
> otterize network-mapper export --server server.otterize-tutorial-npol

apiVersion: k8s.otterize.com/v1alpha2
kind: ClientIntents
metadata:
  name: client
spec:
  service:
    name: client
  calls:
    - name: server
---
apiVersion: k8s.otterize.com/v1alpha2
kind: ClientIntents
# [...]
# and more! For all clients accessing `server` in the namespace `otterize-tutorial-npol`.
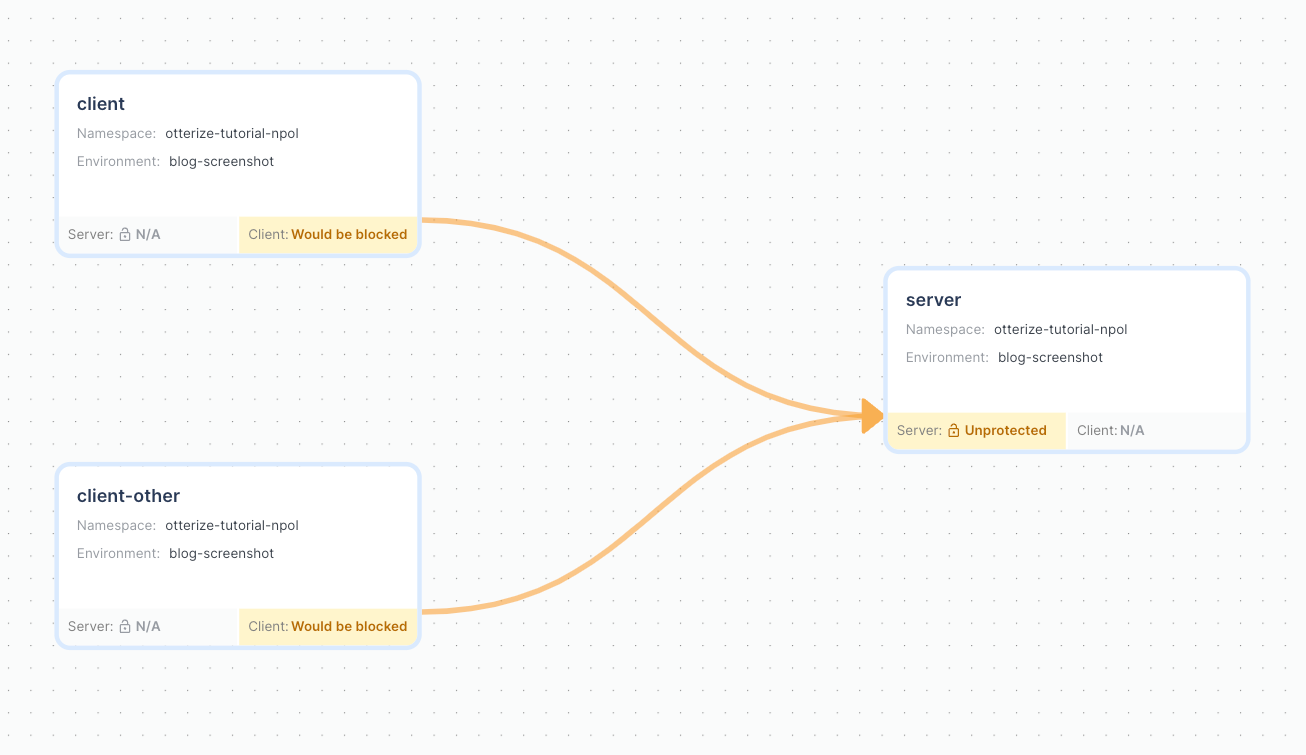
If you deployed Otterize with Otterize Cloud, the cloud will now show that the two services would be allowed, indicated by a green line.
Note that the server still shows Unprotected in yellow. This signifies that Otterize did not create any network policies yet, but because the lines are green, you know that nothing would be blocked if it did.
Step 4: protect server by enabling network policy enforcement
Now that we have ClientIntents declared for all clients that communicate with server, we are ready to protect it.
This is achieved through a custom resource, ProtectedService, that you deploy alongside the server you want to protect.
Once you deploy it, Otterize will create a default-deny network policy for this server, and also create necessary network policies to allow access from clients which have declared they want to connect in ClientIntents.
We know we are ready to do so, since all the lines connected to server in the graph above are green.
Let's do it! Declare the ProtectedService:
cat << EOF | kubectl apply -f - -n otterize-tutorial-npol
apiVersion: k8s.otterize.com/v1alpha2
kind: ProtectedService
metadata:
  name: server-protectedservice
spec:
  name: server
EOF
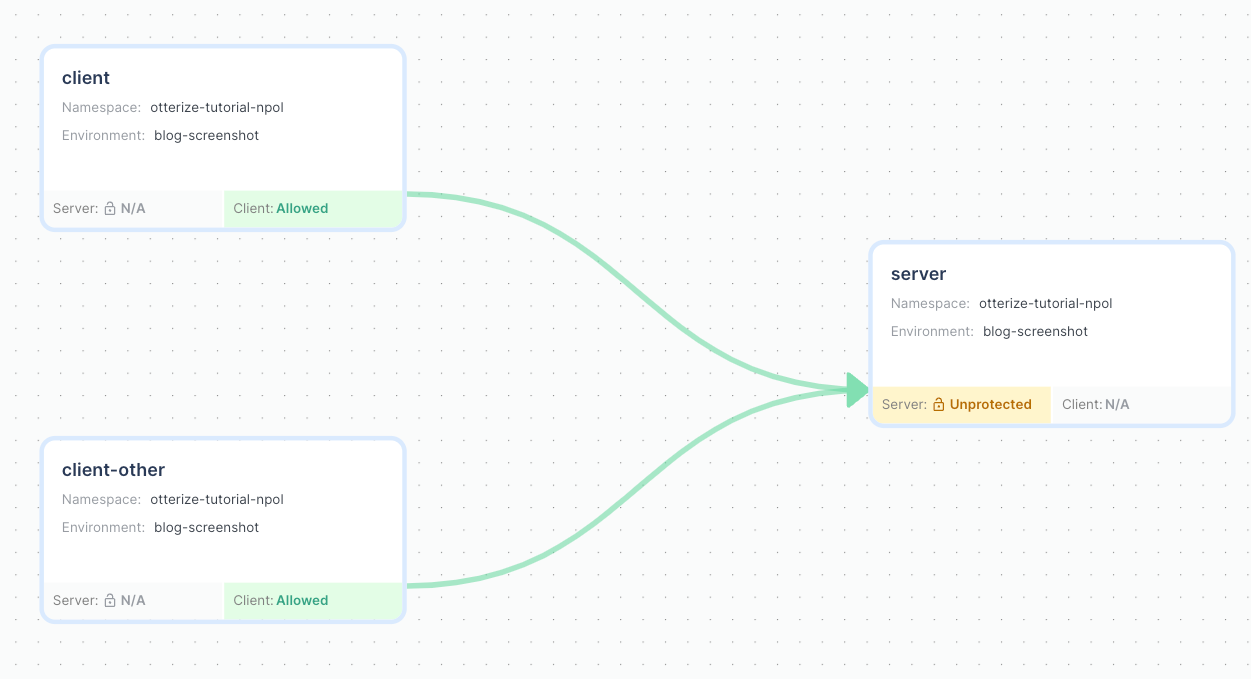
The access graph will now show the server as protected:
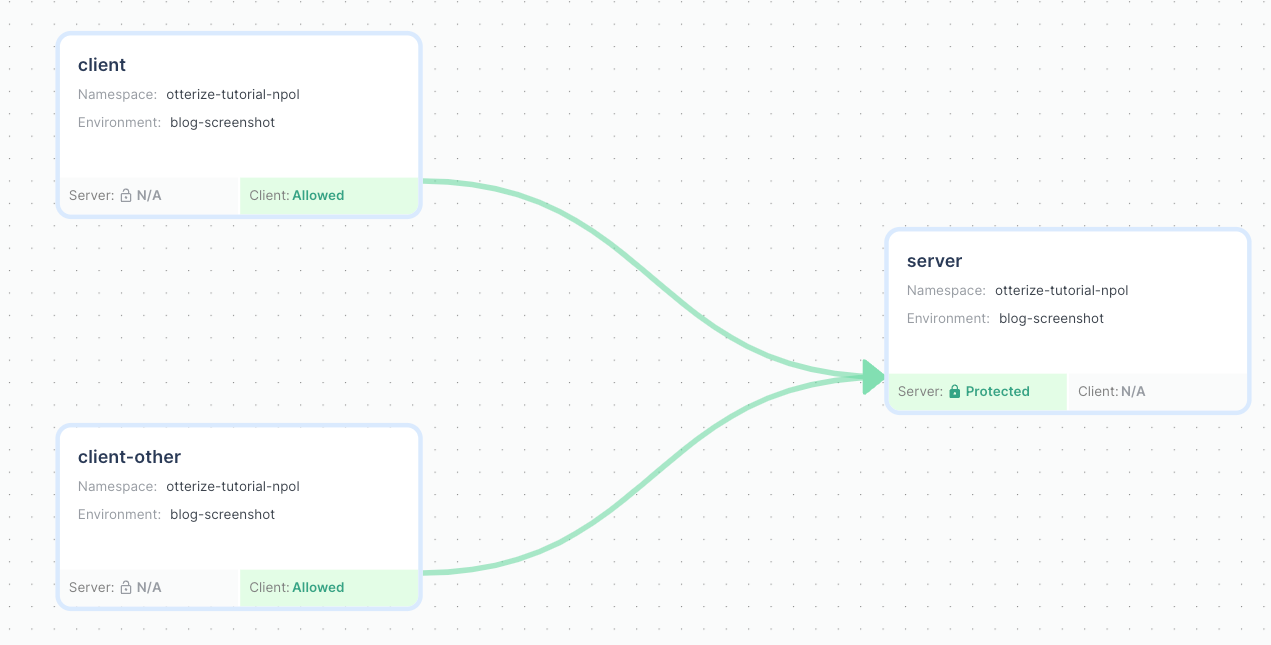
And the appropriate network policies have been created:
kubectl get networkpolicies -n otterize-tutorial-npol
NAME                                           POD-SELECTOR                                                     AGE
access-to-server-from-otterize-tutorial-npol   intents.otterize.com/server=server-otterize-tutorial-np-7e16db   4s
default-deny-server                            intents.otterize.com/server=server-otterize-tutorial-np-7e16db   4s
Done! server is now protected.
Bonus: enforcement for the entire cluster
What if all services have client intents declared, and you want to do this for the entire cluster at once?
You can omit the Helm chart flag --set intentsOperator.operator.mode=defaultShadow, or set it to defaultActive, which will make Otterize create network policies when ClientIntents are created.
However, Otterize will not place default-deny policies for you in this mode. It will only place a default-deny policy if you deploy a ProtectedService resource, one service at a time. If you want to apply a default-deny to your entire cluster at once, you would need to create network policies that do so independently. Since the AWS EKS VPC CNI does not support global network policies or something similar, this would be in the form of a network policy in every namespace.
For example:
apiVersion: networking.k8s.io/v1
kind: NetworkPolicy
metadata:
  name: default-deny-server
  namespace: otterize-tutorial-npol
spec:
  podSelector: {} # all pods in the namespace
  policyTypes:
    - Ingress
Like this article?
Sign up for newsletter updates
Resource Library
Read blogs by Otis, run self-paced labs that teach you how to use Otterize in your browser, or read mentions of Otterize in the media.
- Kubernetes
New year, new features
We have some exciting announcements for the new year! New features for both security and platform teams, usability improvements, performance improvements, and more! All of the features that have been introduced recently, in one digest.
- Kubernetes
First Person Platform E04 - Ian Evans on security as an enabler for financial institutions
The fourth episode of First Person Platform, a podcast: platform engineers and security practitioners nerd out with Ori Shoshan on access controls, Kubernetes, and platform engineering.